
When I was growing up I used to get hand towels from my grandma for my hope chest. I loved them! When I was first married I would use them till they were faded. I didn't want to part with them or throw them out until they were replaced by new ones. Now over the years my grandma has made me several and I've been able to switch them out.
Every month I plan a girl's tea party/ craft day with my friends. We have made so many fun things for our home. The part I love about planning it, I normally choose the craft. So of course I choose things I want to learn to make. A couple months ago I asked my friend to teach us to knit hand towels on a loom.
It was so easy and fun; I have since made 10 different hand towels! This time I chose to make three different colored ones as gifts for my children's school teachers. The kids have a sink in the classroom and I thought they might appreciate a cute hand towel.
I always let the kids choose a gift to give their teachers for the last day of school. Normally we do a plant. I thought this would be a fun change. Can you believe it's already that time again? Summer vacation is coming!

I start by cutting my hand towels in half and sewing a small seam, folded once. Whenever you dry your hands, you usually would grab just one piece of it so it's completely unnecessary to keep both sides to the towel. This way you get two towels for the price of one.

I don't know any special knitting or sewing terms so this is going to be said very simple. In fact, I will try to explain it best with my pictures. This might be a bit like the blind leading the blind. I am definitely no expert here. Thread your craft needle and start by poking it through the backside of your towel. Make sure you also end with the yarn out the backside. This will matter more on a towel with a picture.

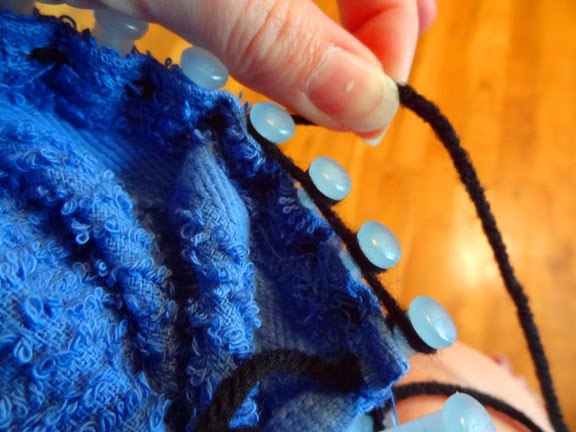
You want to start weaving your yarn in and out until you reach the other end. I try to save as much yarn as possible so I don't cut my yarn off until I've completed the entire row. Then you can play with it and make it fit better. You will need to have extra yarn on both ends, long enough so that when you complete your towel you can tuck your strings in. You can see from the picture about how much I leave on the right end.


Your next step is to slide the loops onto your loom. Make sure the pretty side of the towel faces out, and the backside with the strings in on the middle of the loom.
When I bought my loom it came in a set of 4 different sizes. I always use the smallest, but I know all 4 will work the same. I wait until I get all the loops on and then I tie a knot as close to the towel as possible on each string.

Now you're ready to start your knitting. I tie my yarn onto the peg on the side of the loom before I do the first row. I usually untie it after a couple rows. It's too hard to keep it tied the entire time.

Once the yarn is tied on you can start winding the yarn around the pegs. You start by winding behind the first peg, circle around it clockwise and move on to the next peg. Circle behind it clockwise and move on to the next peg. You continue this until all your used pegs have been circled.

I found this to be very confusing when I was first learning. I took a picture without the distraction of the towel to show you what this will look like. Take notice of the first peg.

The part that looks like a continuous string will always be in the middle of your loom. It should never appear on the outside. Just remember, if you're going clockwise around the loom, you will wrap it counter-clockwise around the peg.
For your hand towel you want to make sure you never do a full circle around the loom. You can use all the pegs on your loom, however you don't work in a continuous circle. I start by going counter-clockwise around my circle, and then once you make it to the end, your next row will be clockwise.

When you have completed your row, find the first peg. This is not the one you just wrapped the yarn around. Using the loom pick, lift the bottom row of yarn over the top of the peg. Work your way counter-clockwise, just like you wrapped it counter-clockwise.


Use your loom pick; lift the bottom row of yarn over the top of the yarn loop you just placed on top.

If you started going counter-clockwise, you will now be circling back around clockwise. You should always go the opposite way you just finished of your row. Every time you switch directions you will wrap your yarn a different way. The way I always remember it is when the yarn makes a continuous line it must be in the middle of the circle, not the outside like I have pictured below.

Keep alternating directions and continue to move the last peg until you make it down to four pegs.


It's up to you how many rows of 4 you want to continue making. I don't have a set amount. I do them until I feel like it will fold over the bar on my stove snugly.


It's very simple to finish it off. You can now cut your yarn leaving about 8 inches on the end. Remember you want to be able to tuck this in. Using your craft needle, beginning with the first peg closest to your yarn, run your needle through the loop on the peg, and gently lift off the peg. Continue to do this for all 4 pegs. When you have all of them off of the loom, tie a knot as close as possible.

You're almost done! You need to tuck in all of your yarn ends. It should be four of them. It's very easy to do this if you thread it into your craft needle. All that is left now is sewing on a button. The yarn is loose enough you can choose anywhere to button it into. There was no need for a hole!

I found some really cute school buttons to add to my hand towels for the teachers! I hope they like them!

I am so glad I learned to make these towels! It's an easy project that you can finish very quickly. I made all three during one movie with my son.
My grandmother's towels will always be special, but it sure is nice to have some backups on hand for when the others are getting ratty looking.
**UPDATE** I recently did a blog post on how to crochet these tops on kitchen hand towels.
Amada, these are great! Before Christmas I had tried to do this, but was not this great. I see now that I tried to do too many stitches. I will do it your way now. Thanks, Shirley
ReplyDelete